Show & Tell
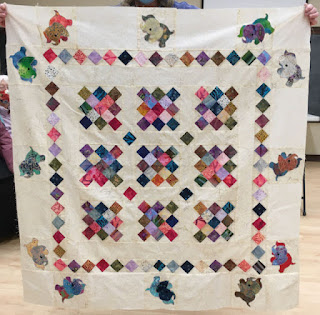
Hope brought a quilt top for Leslie to turn into a donation quilt. The pattern is Trip to Bali, out of the book Baby Bright Quilts.
Justine showed us one of two similar quilts she's making for a friend's granddaughters.
News: Lydia received the quilt labels we talked about using last month. Bafflingly, the name of our group was misspelled as Neele and Eye. The provider will replace the order, but it won't be quick.
Greeting Card Demo
Lydia provided cards, implements, materials, and instructions.
1. Take a card. (You'll need two total.)
2. Embellish it with fabric of your choice, mostly fussy cutting. Glue the pieces in place before stitching them with a jeans needle and a longer stitch length.
3. Place a second card on the back of the first and stitch the cards together around the edge, keeping the embellished side up. [A photo below shows the back side of a completed card.]
4. If you want, write words of caring, your name, or just the guild name, on the back.
5. Put the card in the envelope, but don't seal it.
6. Bring the finished cards to April's meeting when they will be collected for distribution at Aegis Living.
EXAMPLES OF CARDS
 |
| This is the back of a completed card. |
Block of the Month
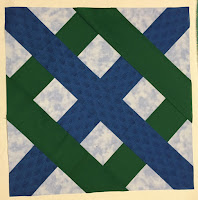
Sandra chose Kentucky Chain for February's block of the month. She avoided templates by constructing it with rectangles and squares, then trimming the completed block to make pointed corners.
Background - This can be light or dark, but needs to have lots of contrast with the other two fabrics. My example is light blue.
Chain 1
Chain 2
The two chain fabrics need to have good contrast from each other,
CUTTING (These sizes are exact. If you prefer to cut large and trim as you go, you will need to increase the sizes of these pieces, except for the length of the three long pieces.)
4 @ 2 5/8 x 2 5/8
From Chain 1
1 @ 19 x 2 5/8
2 @ 3 7/8 x 2 5/8
2 @ 2 5/8 x 2 5/8
From Chain 2
2 @ 12 x 2 5/8
4 @ 2 5/8 x 2 5/8
We’ll be assembling this block as a set of 5 diagonal rows.
3. Sew a Background square onto opposite sides of two Chain 1 squares.
4. Sew a Chain 2 square onto each of the background squares used in step 3.
5. Sew a Background triangle onto each of the squares used in step 4.
 |
| created by steps 3-5 |
9. Sew the segments from step 6 to step 8, matching centers.
The math-free method of squaring up.
Flip your block over and draw intersecting diagonal lines through the central Chain 1 segment from one corner of the surrounding background squares to another. (I use the back side so I don't worry about removing the marks.)
The intersection of these two diagonal lines mark the center of the block, at 6 1/4" x 6 1/4" on your ruler. Rotate the ruler around this point to place its corners in the centers of my blue strips.


